Help for Co-registration Parameters
The Co-registration process in Sarproz is implemented in two different ways ("coreg mode" option in General Options).
One is through Amplitude Cross-correlation. An other one is using only orbits.
In the "only orbits" mode images are coregistered only based on orbital data. This could be useful e.g. when orbital data are known to be
very precise or when other approaches fail.
In the "Amplitude Cross-correlation" mode, patches of Master and Slave images are cross-correlated to find the relative shifts that make
the data match with eachother.
In the "Amplitude Cross-correlation" mode, the Co-registration process is subdivided into 6 main steps:
1. The selection of a set of pre-defined points for calculating the match between Master and Slave pairs
2. The initial calculation of shifts between Master and Slave for the points selected at step 1
3. A cross-correlation between patches from Master and Slave, for estimating the precise shifts from the data
4. An application of a transformation model between Master and Slave on the basis of the estimated shifts, for discarding noisy estimates
5. A precise estimation of model coefficients for calculating the final resampling
6. The final resampling
Each processing step can be customized according to a set of available options
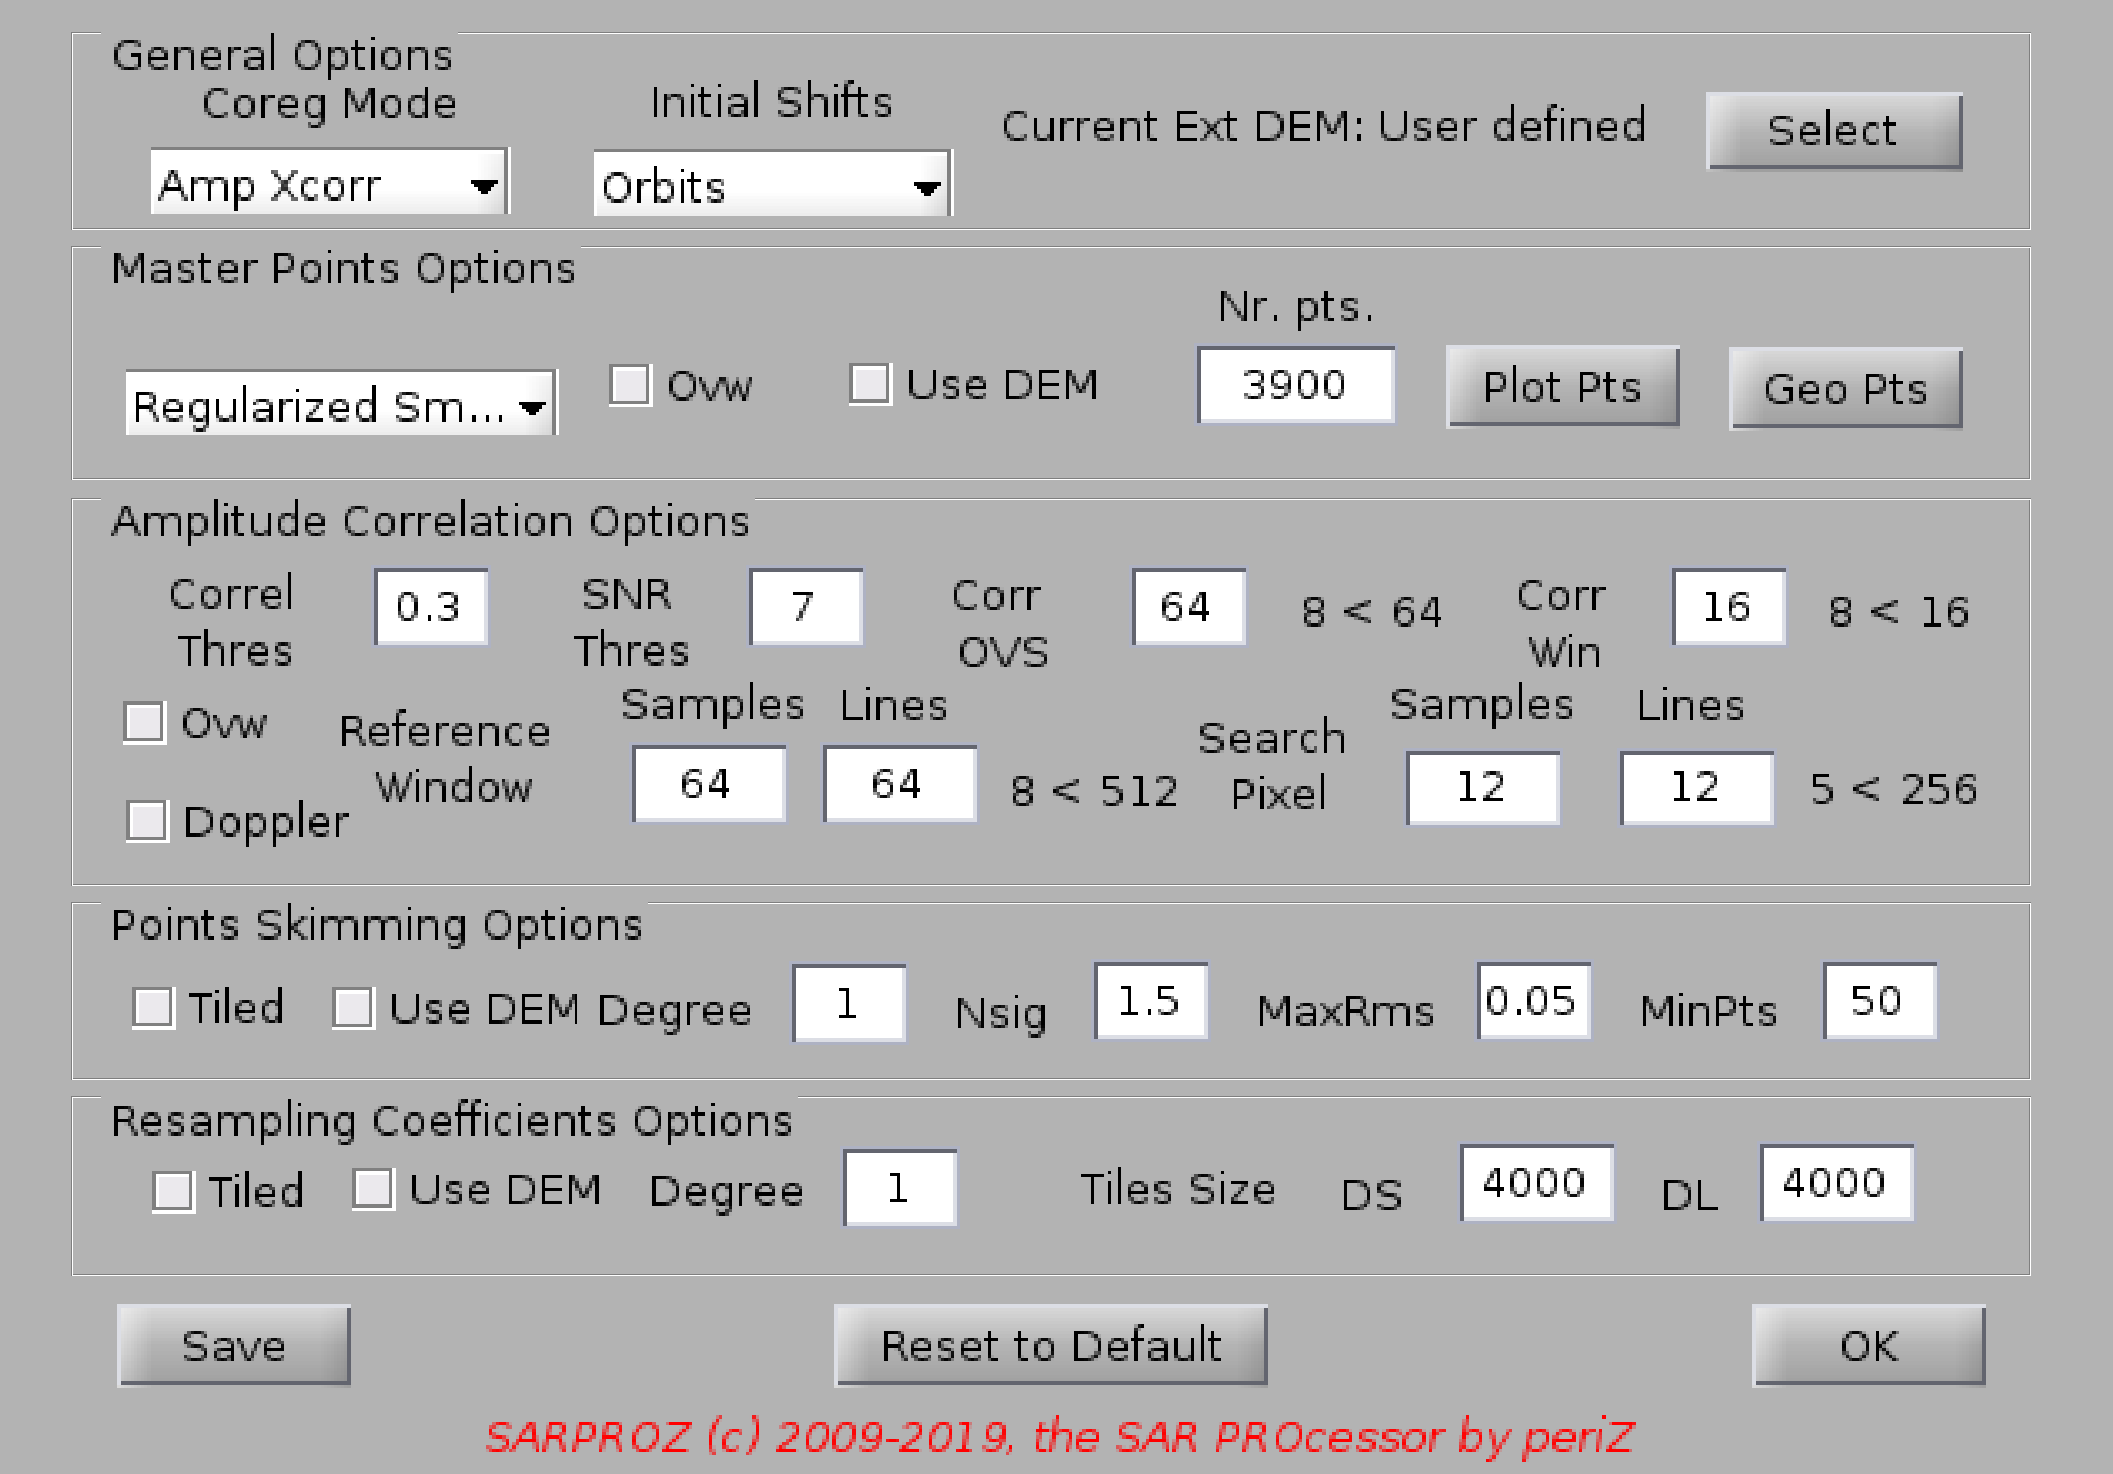
1. "General Options".
A First of all, in the General Options one can choose between
- "Amplitude Cross-correlation" mode
- "only orbits" mode.
In the "only orbits" mode no other options are available, so, we assume hereafter we are in "Amplitude Cross-correlation" mode.
B Then, Initial shifts can be taken from
- "Orbits" (default) - with precise orbits, all default options will work simply well
- "Coarse Xcorr". This option can be selected whehn particularly bad orbits are available and big shifts between the images are observed
C DEM selection: in case you are going to use a DEM to coregister, here you can choose the one you prefer.
2. The selection of the initial set of points can be customized from the "Master Points Options" frame.
A - Regularized Smart (defalut) - points are selected to guarantee a homogeneous distribution
- Smart - points are selected extracting the best point-like features
- Grid - points are selected from a regular grid
B - Ovw - if checked, it overwrites previous master points. If not checked, previous master points are kept -if available-
C - Use DEM - if checked, it reads the external DEM for the selected points
D - Nr of Points - it can be used to increase or decrease the number of initial points
In this frame, master points can be displayed in SAR and geographic coordinates using the corresponding buttons
3. The amplitude cross-correlation can be customized according to the following parameters:
- Correlation threshold and SNR threshold: only points over this thresholds will pass this step
- Correlation Oversampling and Correlation window: used for subpixel shift estimation
- Reference window: size of the window (patch) from the Master image
- Search pixel: searched shifts between master and slave patches
- Ovw option: when checked, previously estimated shifts are overwritten. If not checked, previous shifts are kept -if available-
- Doppler: by checking this flag, the Doppler will be estimated at this step and Doppler metadata infos will be ignored
4. Good matches are selected based on the following options (points skimming options):
- Tiled: the area is divided into tiles and processed independently. This option should be used only in extreme cases where common models do not match
the geometric distortions. Size of tiles can be chosen in the next frame
- Use DEM: a 3d model is fit in the shifts (range, azimuth and height). This option requires to have generated master points using the he
- Degree: degree of the polynomial model used to fit the shifts
- Nsig and MaxRms are used to discard points that do not fit in the chosen model
- MinPts is a threshold below which the iterative process exits without a successfull solution
5. The final coefficients for resampling are calculated according to the following variables:
- Tiled: different polynomial coefficients are estimated on different tyles (in this frame the size of tiles can be changed)
- Use DEM: with this option, the height is used as third dimention and coefficients are estimated along it
- Degree: degree of the polynomial model used to fit the shifts
- Tile Size: size of crops used for tiled processing
After changing options, the save button becomes red. Changes have to be saved in order to be recorded and applied by the software.
The software saves results for each processing step.
If previous results are available at the processing time, they will be used instead of re-processed again. However, if options have changes, results will be
processed again. Also, if the "OVerWrite" flag is on, results will be overwritten.
Important consequence:
if for some reasons you want to overwrite an already coregistered SAR image, you may keep previously saved resampling coefficients. What you need to do is
re-extracting the slave image and run the coregistration again. The sw will not re-process the resampling coefficients: it will read them from the disk and
apply them to the original SLC image.