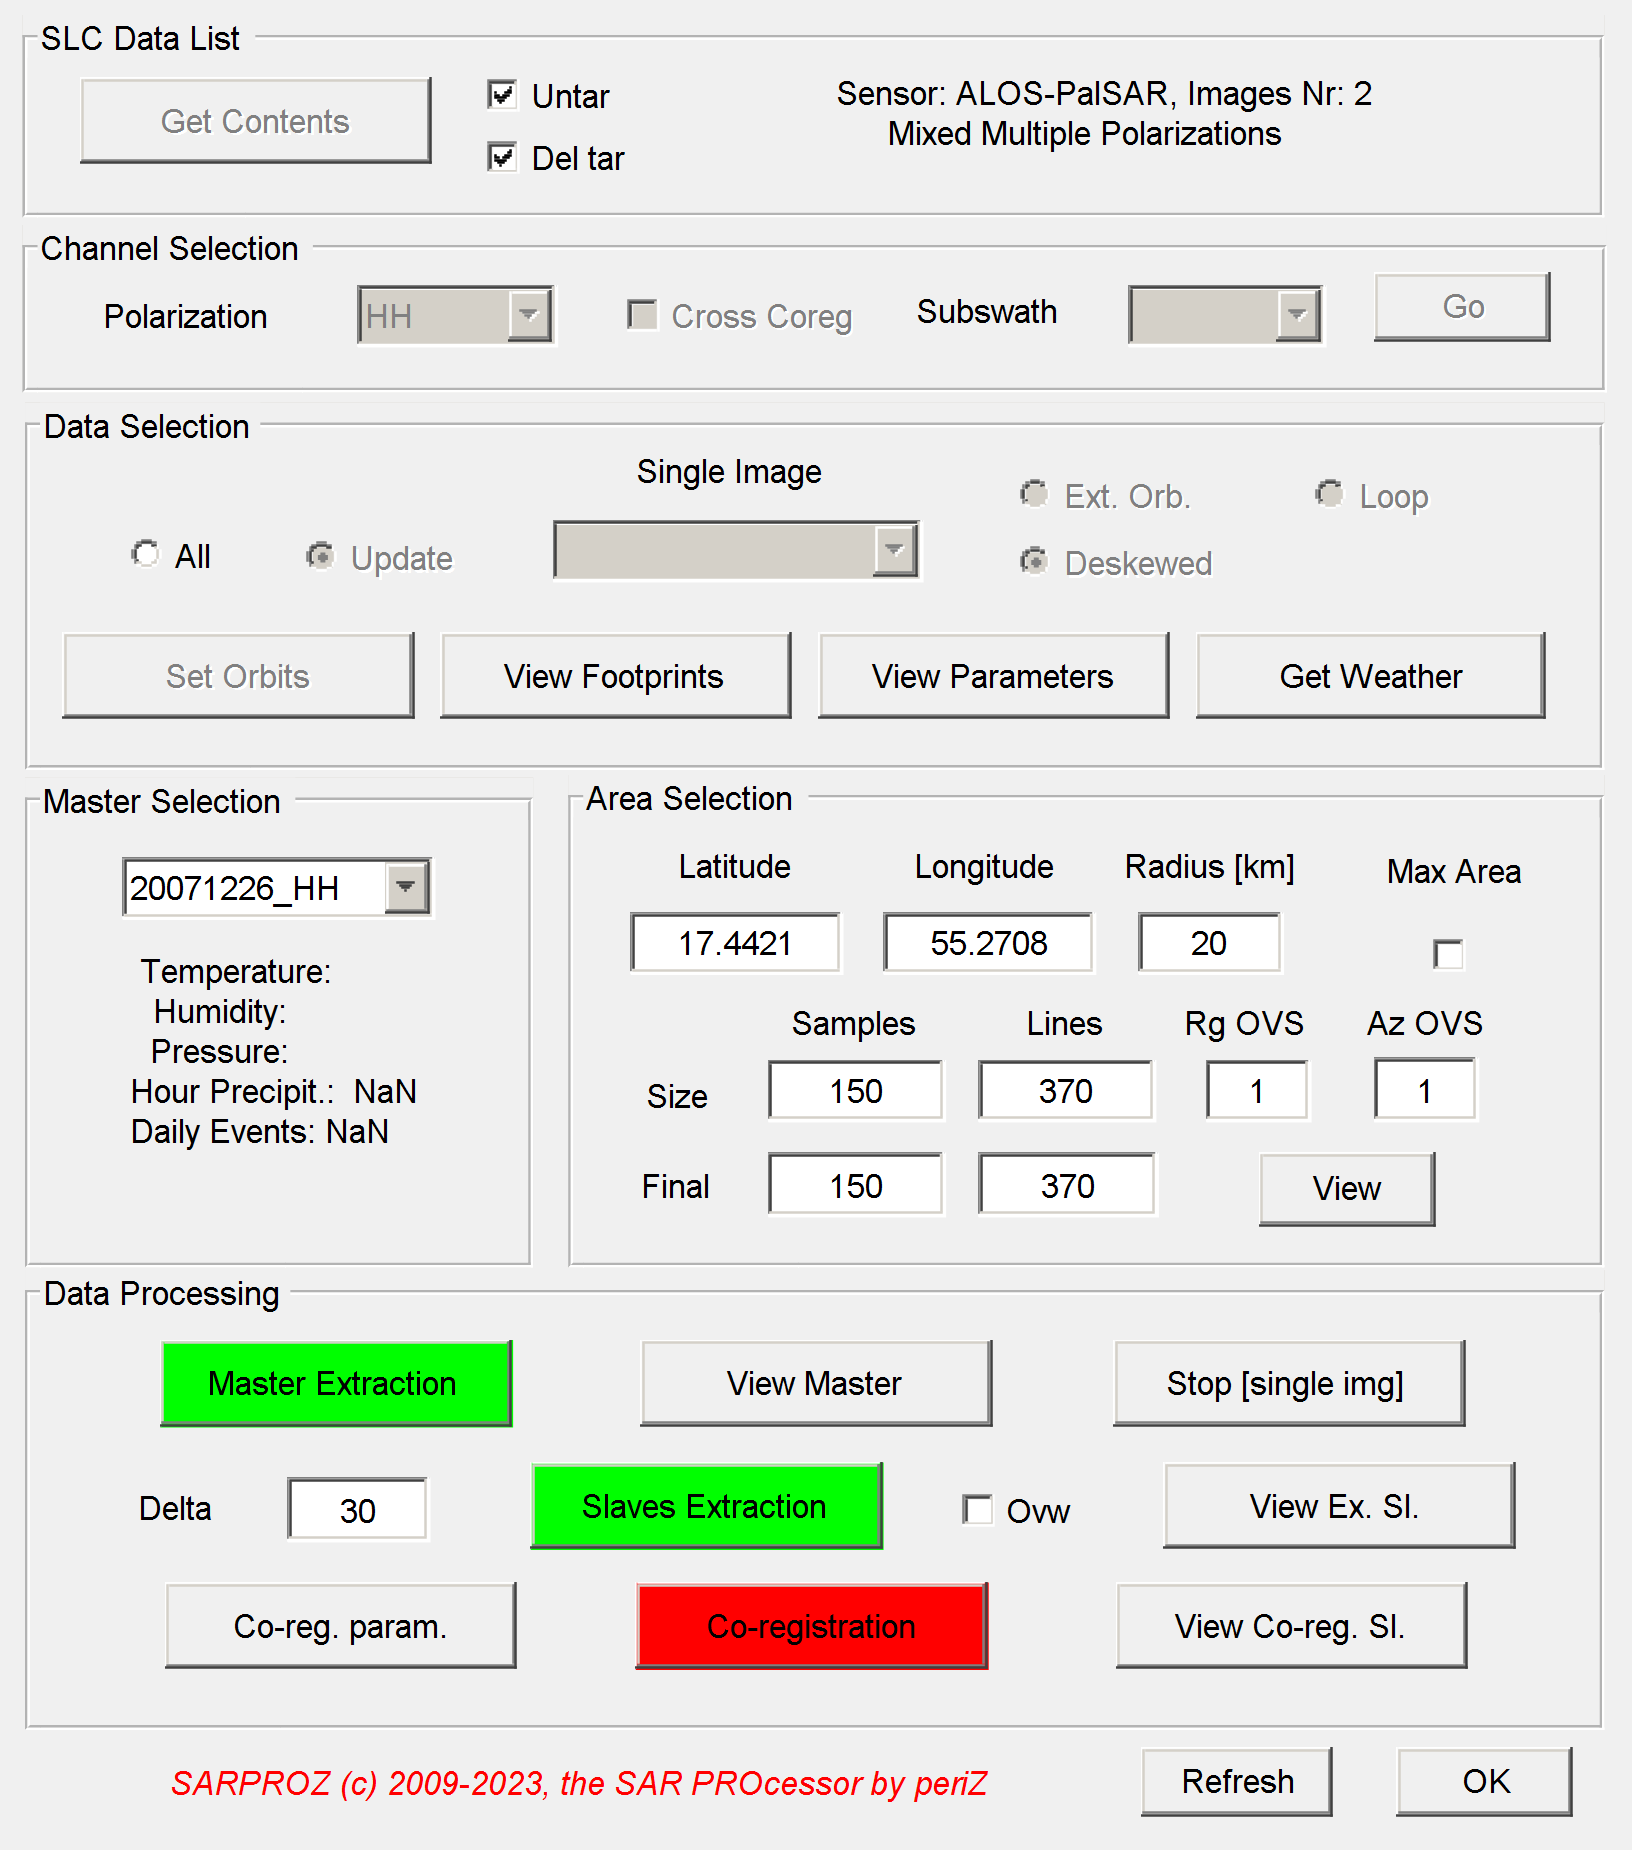
SLC data module
With this module you can import SLC data.
1) place your SLC data in the SLC folder in the dataset directory (e.g. c:\my_syte\SLC)
2) by selecting the directory "c:\my_site" from the dataset "selection module", if the directory SLC is found in "c:\my_site", the SLC module will be
automatically opened
3) press the button "Get Contents": the software will analyze the content of the SLC folder and give you a report.
some information is written on the window, in the SLC Data List frame, like Sensor, Number of Images, Polarizations
some information is also printed on the screen. The tool is checking also orbits, acquisition mode and so on: only interferometric datasets are
supported.
OPTIONS
-Untar: if this option is selected, tar, zip, gzip files are extracted. This option is not working under windows
-DelTar: if this option is selected, after a successfull extraction, the zipped files are removed
4) if options are given (e.g. you are importing a dataset with multiple polarizations) check the polarization you want to work with from the "Polarization"
frame.
5) For creating a new dataset, keep the option "All" in the "Data Selection" frame and press "Set Orbits". The tool will read the orbits from the SLC data.
OPTIONS
-If a dataset was previously created, you can import new images with the "Update" option. All new SLC data placed in the SLC folder will be imported
-You can also choose to import a single new image by selecting it from the "Single Image" menu.
-If a dataset was previously created and you want to remove all previous results and start over again, you can keep the "All" option
and press the "Set Orbits" button again. A security window will be opened to ask for a confirm.
-The option "Ext. Orb." allows importing external orbits. Currently, this option is implemented only for ERS, Envisat and Sentinel. When importing ERS,
Envisat and Sentinel, the option is automatically selected. [check the note at the bottom for more details about external orbits]
-The option "Loop" can be chosen to keep trying downloading orbits even if errors are found. In this way,
-The option "deskewed" is generally automatically set while reading auxiliary data. However, if your data do not contain such information, you have to manually
indicate if images are desewed or not
-Weather data can be optionally downloaded at this stage. This may be useful to check whether any precipitation occurred at the Master date.
6) After setting the orbits, the footprints can be visualized in Google Earth by pressing the "View Footprints" button. Google Earth should be automatically
opened. If this creates problems, it can be disabled from the "Advanced Parameters" in the "dataset selection" window.
7) Also an estimation of the dataset parameters can be visualized by pressing the "View Parameters" button.
8) After setting the orbits, an automatic Master image is proposed. By plotting the parameters and/or by downloading weather data, the Master may be
changed manually.
9) After selecting the Master, the area to be extracted can be set up from the "Area Selection" frame.
OPTIONS
-the center coordinates of the area to be extracted can be changed using the Latitude/Longitude text input boxes
-the area can be set up by inputing a radius [km] in the corresponding box
-the tick "Max Area" allows selecting the maximum common are of the dataset footprints
-the final image size can be manually set using the corresponding boxes
-also the oversampling factors in range and azimith can here be chosen
10) Once the area is set, it is poossible to visualize it in Google Earth pressing the button "View"
11) After Master and Area are given, data can be extracted starting from the Master image ("Master Extraction")
12) The Master image can then be plotted pressing the button "View Master"
OPTION
-if a single image is imported, the dataset can be closed using the button "Stop [single img]". This option can be used to extract and visualize
a single image.
13) Consequently, Slave images can be extracted with the button "Slave Extraction"
OPTIONS
-the slave image must be bigger than the Master one, to allow searching for the matching area. This is achived by giving a "Delta" in pixels.
Should the coregistration fail, Slave images can be visually checked. If a big shift w.r.t. the Master image is visible, the "Delta"
should be increased till assuring enough overlap with the Master image.
-if a slave images was already etracted and a wider image is needed with a higher Delta, the "Ovw" -overwrite- tick must be checked.
14) Extracted Slave images can be visualized with the button "View Ex. Sl."
15) Once Slave images are extracted, they can be coregistered using the button "Co-registration".
OPTIONS
Co-registration parameters can be changed using the "Co-reg. param" button.
See the Help for Co-registration Parameters.
16) To conclude, co-registered images can be displayed pressing the button "View co-reg. Sl."
[note for external orbits]
** ERS and Envisat orbits **
The orbits are automatically downloaded from internet.
Should the process fail, external orbits are organized as follows:
- external orbits are saved in an ORBITS folder at the root of your data folder
e.g. c:\data\ers_dataset is your dataset folder
external orbits are stored in c:\data\ORBITS
- internal structure:
ORBITS\ENVISAT\yyyymm
ORBITS\ERS1\yyyy
ORBITS\ERS2\yyyy
- DOR_VOR orbits are used for Envisat
- PRC orbits for ERS
** Sentinel 1A/1B Orbits **
ORBITS/S1A(S1B)/yyyy/mm/aux_poeorb(aux_resorb)/*.EOF.
aux_poeorb stores the precise orbits and aux_resorb stores the restitute orbits.
To download Sentinel orbit files automatically, you need a Copernicus account: https://dataspace.copernicus.eu/
Related documentation: https://documentation.dataspace.copernicus.eu/Registration.html
Insert your user/password here: https://sarproz.com/manual/adv_param.html