Help for DATASET SELECTION
With this function you can select the dataset to process
Press the Select button and choose a directory
es: c:\my_data\my_site is your DataSet directory
At this moment, Sarproz is not including a focusing module.
Thus, you can import in Sarproz the following formats:
a. SLC data (not-registered, as provided by data distributors or focused by other sw)
--> place data in folder SLC
b. co-registered SLC data
--> place data in folder RSLC
a. SLC data.
* Sensors currently supported as provided by data distributors:
- ERS 1-2 and Envisat
- Cosmo 1-2-3-4
- TerraSAR-X and Tandem-X
- ALOS (JAXA and ERSDAC)
- RadarSAT 1-2
- Sentinel 1
- Kompsat-5
Simply place the data in a directory called SLC within the DataSet directory (e.g. c:\my_data\my_site\SLC).
Sarproz will automatically detect the data format and sub-directories trees.
In Linux, data are un-tared or un-zipped automatically by the software.
In windows, you should create a directory for each image (and you may need to un-tar/un-zip data manually).
* data focused by other software:
- ROI_PAC: ERS-Envisat-ALOS (for adding other sensors, please contact the administrator. a few quick changes are needed)
Place yyyymmdd.slc and yyyymmdd.slc.rsc files in the folder SLC (do not use sub-directories).
! for ALOS ROI_PAC: Rename all LED-ALPSRP*********-H1.0__A files into yyyymmdd.led and place them in the SLC folder !
- GAMMA: place files yyyymmdd.slc and yyyymmdd.slc.par in the SLC folder
b. co-registered SLC data
- Any sensor supported by Gamma can be imported
simply place all registered SLC files (.rslc) and the parameters files (.rslc.par)
in a directory called RSLC within the site directory (e.g. c:\my_data\my_site\RSLC)
file names must be in the form yyyymmdd
The software will operate automatically a conversion
- for importing data co-registered by ROI_PAC, please contact the administrator
Once data are imported in Sarproz, the site can be accessed at any time
simply selecting the directory that contains the generated directory tree
(es c:\my_data\my_site)
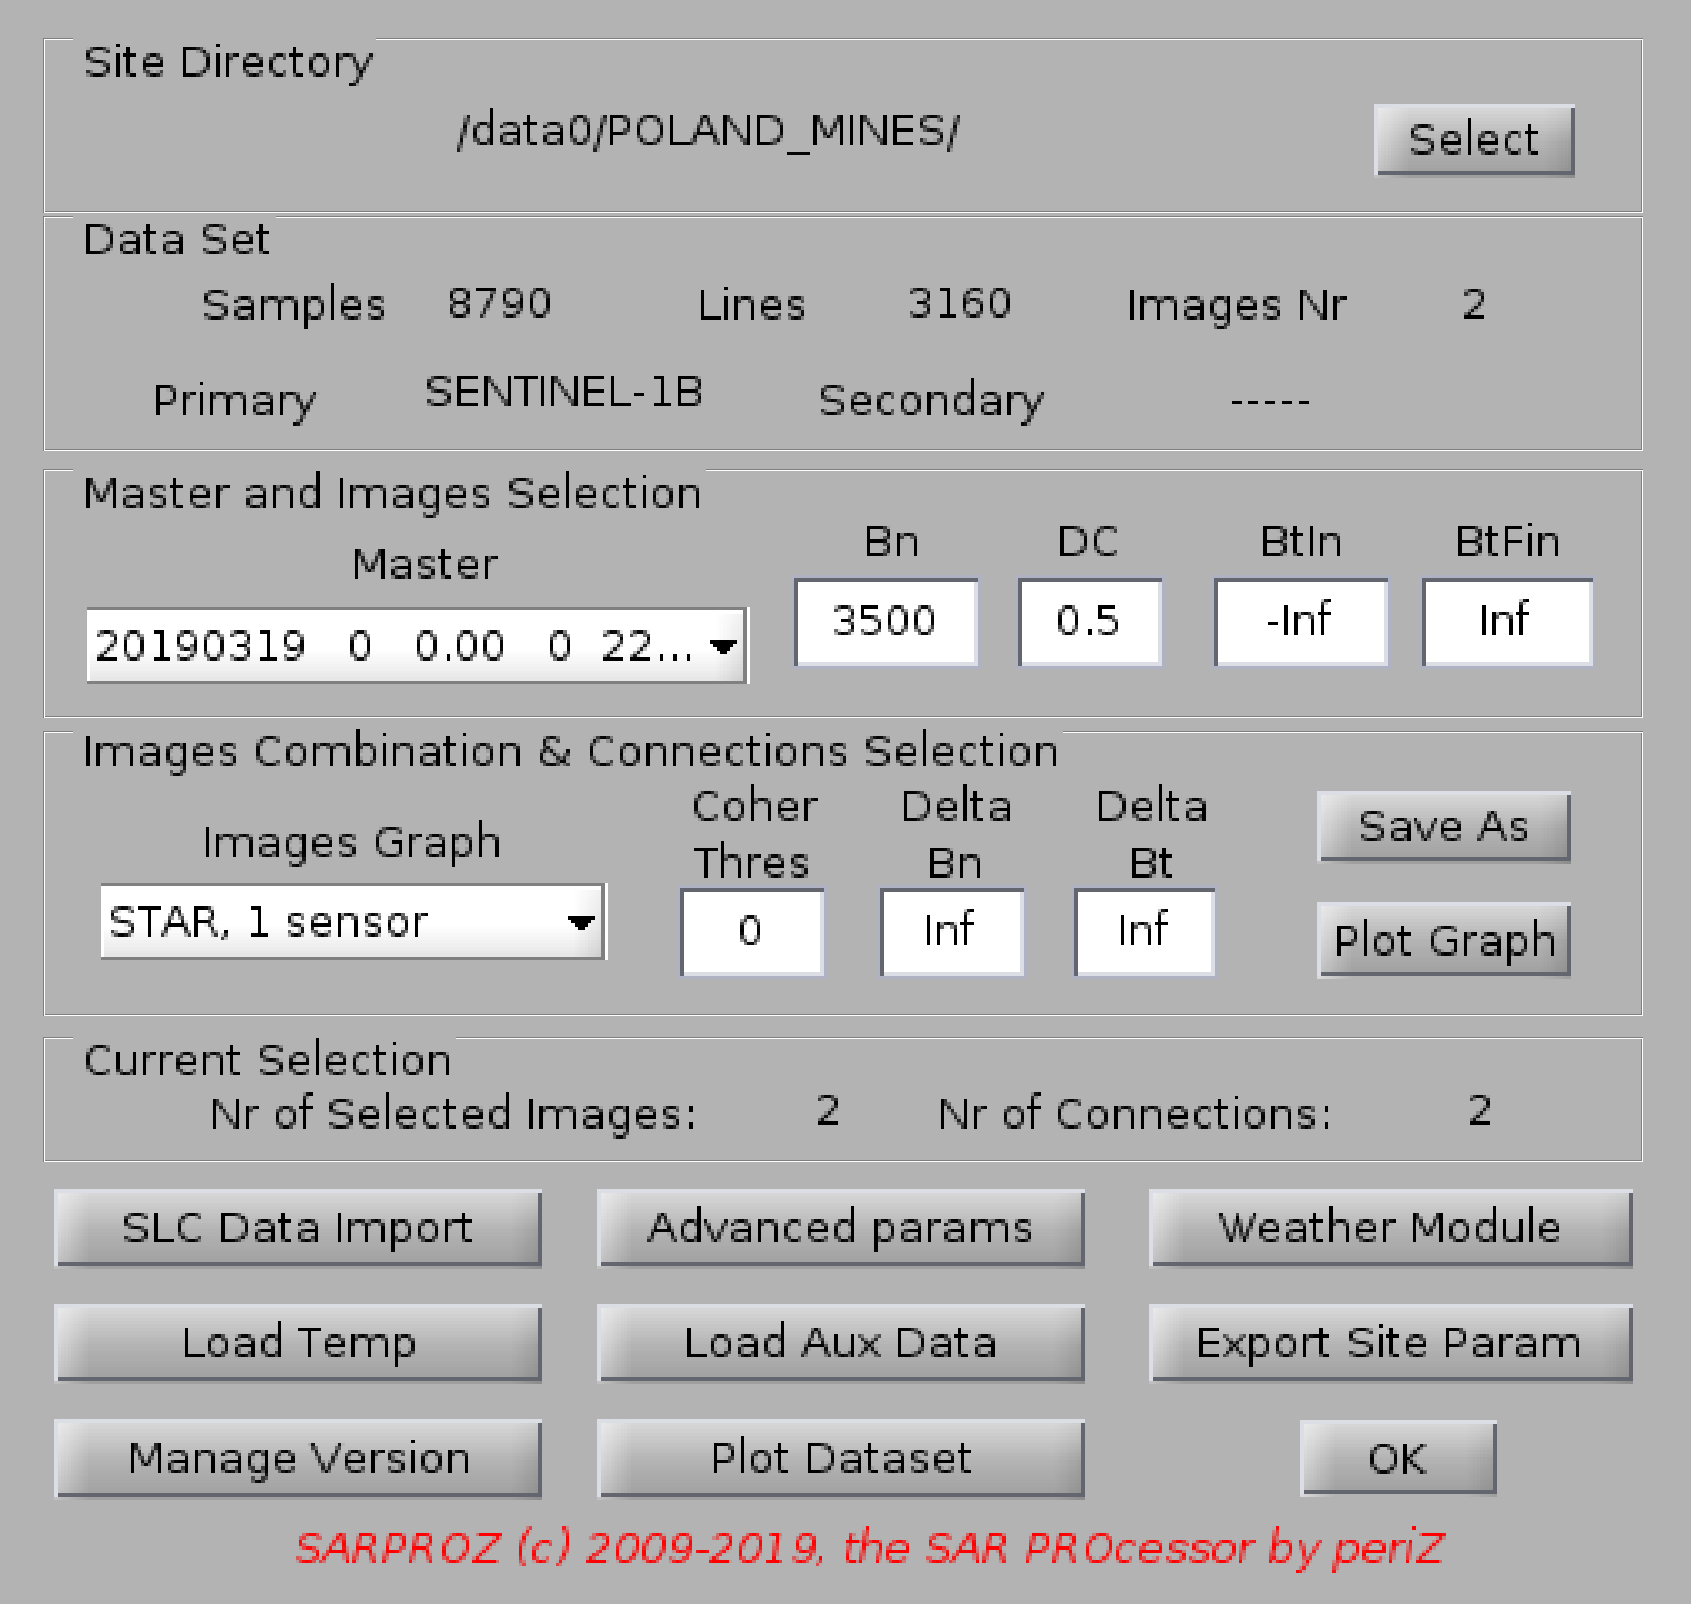
After loading the dataset, the size of the images will be shown in the window DATASET SELECTION
(Samples in Range and Lines in Azimuth)
The name of the used sensor (as ERS or Envisat, TerraSAR, ALOS, CosmoSky-med, RadarSAT, Kompsat)
will appear in the field Primary
The software has also the possibility of processing two sensors together (as ERS and Envisat. See References).
To do this, you need to create an other folder within the DataSet directory.
The folder must be named with the second used sensors (e.g. c:\my_data\my_site\ENVISAT if the second sensor is Envisat)
At the moment this option is implemented for: ENVISAT, ERS, RADARSAT
The second dataset must be independently converted into the software format
With this function you can also choose a different Master Image (choosing among the available images)
You can put thresholds on Normal Baseline and Doppler Centroid to reduce the set of images
to process
Moreover, the software gives you the possibility to choose which pairs of images to process for interferometric and multi-image purposes:
Through the menu "images graph" you can choose among:
-STAR graph, 1 sensor
-STAR graph, 2 sensors, 1 master (coherent combination)
-STAR graph, 2 sensors, 2 masters (un-coherent combination)
-MST (Minimum Spanning Tree, obtained by maximizing the coherence of all interferograms), 1 sensor
-MST, 2 sensors
-Full Graph (all possible connesctions)
-Small Temporal Baselines
You can download weather data from Internet using the button "Get Weather Data"
You can import your own temperature data using the button "Load Temp". Such values are used in the time series processing for estimating the thermal expansion.
The format must be a txt file with as many values as the images
in your dataset. Be careful: no check is carried out on the imported data. Temperature must be taken at the satellite acquisition time.
If you want to switch back to automatic temperature data downloaded by the software, press the button "Load Temp" and then cancel the operation.
You can also import other auxiliary data using the button "Load Aux Data". Such data will be used instead of Doppler Centroid values.
So that you may estimate a dependency of the phase values on your parameter (currently the subpixel azimuth position can be estimated using DC values).
Be careful (1): Doppler is here referred to the PRF.
Be careful (2): a threshold is applied by the software to Doppler values. It means you have to either normalize your data to the same
range of values or you have to modify the Doppler threshold.
If you want to switch back to real Doppler values, press the button "Load Aux Data" and then cancel the operation.
Finally, you can export the site parameters through the button "Export Site Param". Such function will generate a ExportPar.tgz file which can be sent to other people
for replicating your site parameters. You have to include such file together with other mat files you want to share (e.g. AutoConnex.mat if you want to share
your APS processing results with others, or any files in RESULTS/GUIDE if you want to send a small area)
References:
D. Perissin, C. Prati, M. Engdahl, Y.-L. Desnos, "Validating the SAR wave-number shift principle
with ERS-Envisat PS coherent combination", IEEE Transactions on Geoscience and Remote Sensing,
Volume 44, Issue 9, Sept. 2006 Pages: 2343 - 2351.